Introduction
Welcome to the world of Arduino Programming language! The Arduino Programming Language is a great place to start whether you’re interested in electronics as a hobby, student, or just a general person. It breaks down difficult ideas so you may start learning about microcontrollers and creating enjoyable projects. You can easily develop countless innovative projects by the combination of the Arduino Programming Language and the intuitive Arduino Integrated Development Environment (IDE).
So, get ready to explore the endless possibilities that the Arduino Programming Language offers. Whether you’re looking to learn, innovate, or just have fun, Arduino is here to make it all accessible and engaging.
Understanding the Basic Concepts of Arduino Programming language
For microcontroller applications, the Arduino Programming Language is a condensed form of C/C++. It makes classic programming languages easier for novices to learn by simplifying them.
Why Arduino is the Best Microcontroller Choice:
The broad community support of Arduino is one of its most notable features. There are a ton of libraries, tutorials, and forums to assist you because it is open source. This cooperative setting makes it much simpler to solve problems and find ideas for new projects.
The key features of Arduino Programming Language are its ease of use, open-source status, and smooth hardware integration.
These characteristics make it ideal for creating interactive devices and environments. Examples of applications in which Arduino excels in the real world are home automation, robotics, and all sensor driven projects. If you can imagine turning on lights with tapping, or build a robot that can follow a line, you can do that with Arduino!
How to start working on Arduino:
Getting started with Arduino doesn’t require a background in electronics or programming. The language is designed to be straightforward, making it easy for beginners to pick up. By breaking down complex tasks into manageable parts, Arduino empowers you to create functional and interactive projects quickly.
Understanding the basics of the language, such as variables, functions, and loops, will enable you to build a variety of projects. Whether you’re aiming to automate simple tasks or create complex systems, the Arduino Programming Language provides a robust foundation for your endeavors.
Getting Started with the Arduino IDE
If you want to start learning Arduino, you must be familiar with the Arduino Integrated Development Environment (IDE). Although the Arduino IDE is the main tool used to write, compile, and upload code to your Arduino boards.Your programming process will be smoth due to its easy user interface and great community support.
Cross-Platform Compatibility of Arduino IDE
The IDE is available for all major operating system such as Windows, Mac and Linux. You just need to download the Arduino IDE from the official Arduino website and follow few easy Installation instructions. On Windows, you may need additional drivers but the process is trivial for Mac and Linux users.
Exploring the Arduino IDE Interface
After installing the software, you can open the IDE to explore its features. The interface includes a code editor, a message area, a text console, a toolbar with buttons for common functions, and a series of menus.
Arduino IDE Community Resources
There are the community resources being included with the Arduino IDE. For newbies, it introduces you to built in examples, to extensive libraries and has a host of tools to assist you in learning and fixing. They have some example sketches especially useful for beginners, where they give you template code for common tasks such as blinking an LED or reading a sensor.
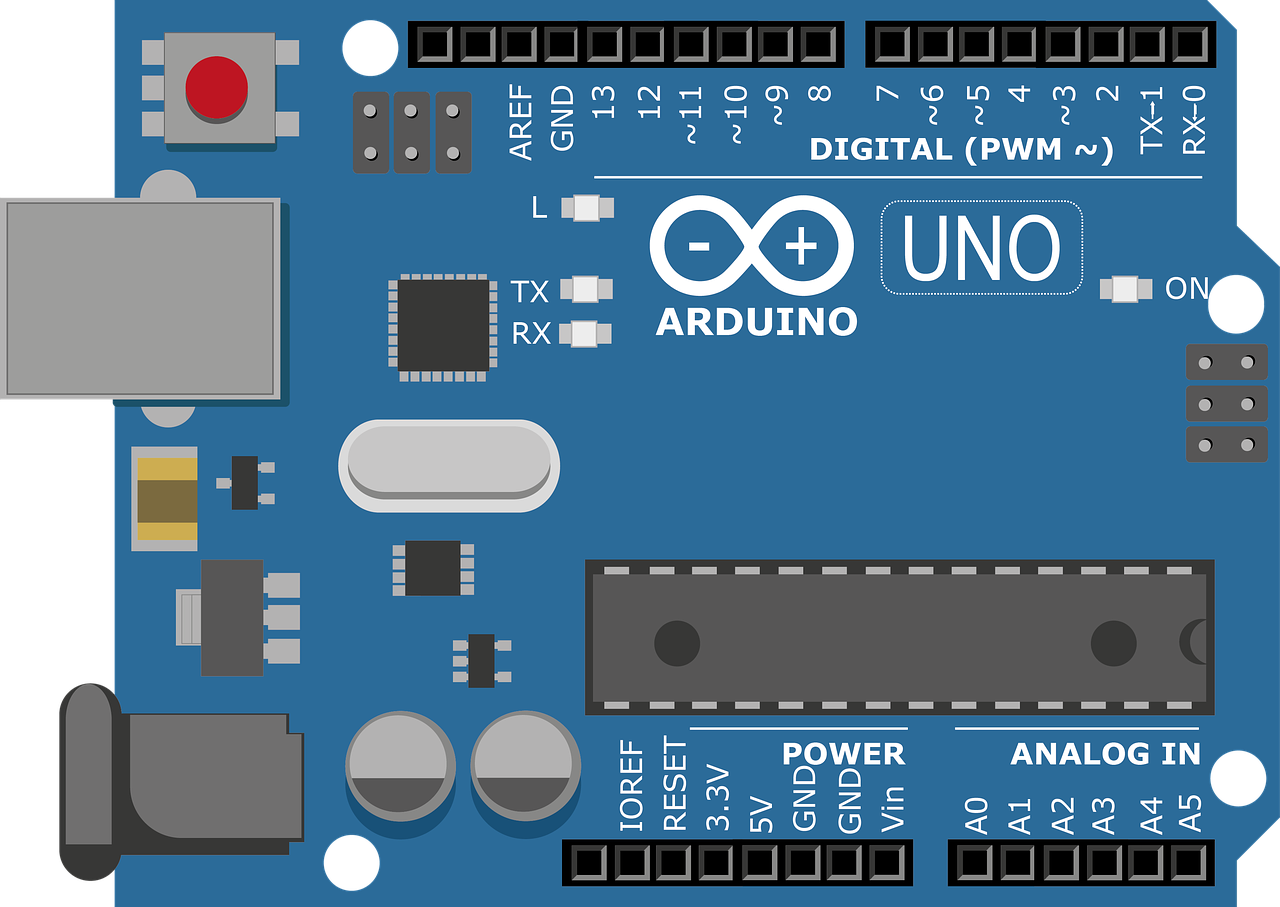
Connecting Your Arduino Board
To connect your Arduino board to your computer use a USB cable. Make sure your board is chosen correctly in the IDE such as Arduino UNO, Arduino Mega. It’s very important to get this step right to successfully upload code. Serial Monitor is useful for debugging and monitoring your board output.
Grasping the Fundamentals of Arduino Coding
Learning to code with Arduino is exciting and simple, even for beginners. At its core, an Arduino program is made up of two primary functions: `setup()` and `loop()`.
In ‘setup()’ you set up settings, including pin modes and communication protocols. This function is called at the start only once. The loop() function on the other hand, always runs the same unless you stop it or another code blocks it and runs continuously making your Arduino do something again and again.
Make sure you know how to write the basic syntax and commands to use in the program to get started. Variables will help you store data, functions will let you group your code, loops will help you repeat actions, and your conditional statements will allow you to make decisions.
Consider a simple example program of blinking the LED . First, define the pin connected to the LED. In setup(), set the pin mode to output using the pinMode() function. In loop(), control the LED by turning it on and off with the digitalWrite() function and adding delays using the delay() function to create the blinking effect.
Here’s a quick example:
int ledPin = 13;
Here, you are defining ‘’pin 13’’ with a variable ledPin.
void setup() {
pinMode(ledPin, OUTPUT);
}
In the Setup, you must declare the I/O pin as an Output, because this pin will be used as an output in this case.
void loop() {
digitalWrite(ledPin, HIGH); // Turn LED on
delay(1000); // Wait 1 second
digitalWrite(ledPin, LOW); // Turn LED off
delay(1000); // Wait 1 second
In the loop, you will make the ledPin high and then Low and add a delay of 1 second between transition .
Transferring Your Code to an Arduino Device
First, use a USB cable to connect your Arduino board to your computer in order to transfer your code to an Arduino device. Make sure you have chosen the appropriate board and port from the “Tools” menu in the Arduino IDE. In order for the IDE to identify and connect with your Arduino board, this step is essential.
Selecting the Correct Board and Port in the Arduino IDE
First, use a USB cable to connect your Arduino board to your computer in order to transfer your code to an Arduino device. Make sure you have chosen the appropriate board and port from the “Tools” menu in the Arduino IDE. In order for the IDE to identify and connect with your Arduino board, this step is essential.
Understanding the Upload Process
The RX and TX LEDs on the Arduino board may blink while the code uploads. This shows that data is being transferred between the board and your PC. Check that the code is working as expected by looking at your linked hardware, such as an LED, when the upload is finished. The hardware will respond as your program specifies if everything is operating as it should, providing instant feedback and satisfaction.
Resolving Common Issues
Don’t panic if you run across problems with your Arduino projects; troubleshooting is an important learning exercise.
A common issue is compilation errors, which often stem from incorrect board selection or missing libraries. Ensure you’ve chosen the right board in the “Tools” menu and installed the necessary libraries via the Arduino IDE’s library manager.
Fixing Compilation Errors
If your code fails to upload, double-check that the correct port is selected. You can find this option in the “Tools” menu under “Port.” Sometimes, simply pressing the reset button on your Arduino board can fix upload problems.
Troubleshooting Upload Issues
Utilize the Serial Monitor for debugging. This tool can help you see what’s happening inside your program by displaying variable values and states. By strategically placing Serial.print() statements in your code, you can track down where things might be going wrong. For instance, if your sensor readings aren’t as expected, the Serial Monitor can help you verify the data being received.
Conclusion:
We’ve journeyed through the essentials of Arduino programming, from understanding its foundational language to mastering the IDE. Arduino’s blend of user-friendliness and powerful capabilities makes it a fantastic platform for both learning and creating.
Remember, practice is your best friend. Try out different projects, play around with code, and don’t be scared to make mistakes, it will give you more experience. You can take help from Arduino Support community.
As you grow more confident, explore advanced tutorials and challenges. Your next innovative project is just around the corner. Keep coding, keep exploring, and most importantly, have fun! Happy coding!